


Connecting with your loved ones using a card and a temporary tattoo? Why not!? Here’s how to do it.
Greeting Cards are often used as a way of expressing sentiment during birthdays and holidays, but in a time where social interactions are few and far between, sending a friend or family member a greeting card may be just what we need to feel connected.
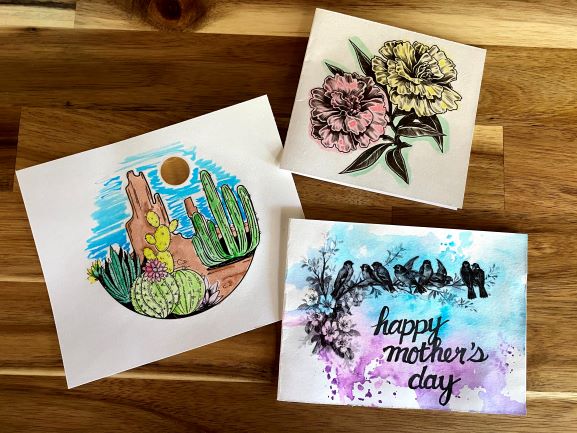
And when it comes to connecting with others, what says, “I’m thinking of you,” more than a homemade card? By simply using a few temporary tattoos and watercolor techniques, I made some gorgeous cards I sent to my loved ones.
Top 3 Easy Methods To Create DIY Watercolor Cards
I used three different watercolor applications to create separate looks for each card.
The first was the obvious watercolor palette I had hiding in my craft closet. The next was a self-inking paint palette I cut from a Magic Paint Poster Booklet that I purchased from our sister site, CraftBoxFactory.com. And my last method uses magic markers, a plastic storage bag, and a spray bottle.
Each method creates a unique watercolor look that is a lot of fun to customize each card.

Connecting With Temporary Tattoos: Setting The Scene
Before we get started, and I show you how easy connecting with others through a DIY card can be, I want to go over the temporary tattoo application process that we will use for each card.
Choosing Your Favorite Temporary Tattoo Designs
Of course, it all starts with choosing from the widest range of designs you can wish for on our website, Temporarytattoos.com. As we mention below, line drawings — such as tribal designs, henna, and black and white motifs will work wonders.
Applying The Tattoo On The Card
It is the same process you use for your skin, but with a little extra caution.
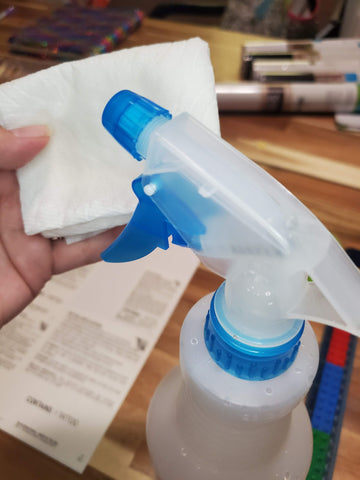
When applying the tattoo to the paper, avoid using excess water. Because, what happens when paper gets wet? It starts to wrinkle and curl. To avoid this, I prefer to use a spray bottle and a paper towel. This helps me control the amount of water used.
Moreover, I also like to trim my temporary tattoos before placing them so I can get a better picture of where they will sit on my project.
Once you know where you would like your temporary tattoo, remove the plastic film and flip the tattoo onto your paper.
Temporary tattoos are a little sticky, so do not apply pressure until it is exactly where you want it. Now spray water onto your paper towel so it is wet — but not soaking — and apply pressure to the back of the temporary tattoo.
Blot the backing until you begin to see the image through it. This is a good sign! You can test a corner of the tattoo to see if it is ready to release. If the paper pulls up easily, go ahead and slowly peel the paper back to reveal your design. If it is still tacky, continue blotting and try again.


Now that you know how to apply the tattoo, let’s go through our three chosen techniques!
1. Watercolor Palette
The first step for making each card is to choose your temporary tattoo. Since we will be painting these, we want to make sure we choose a temporary tattoo that is mostly line art or a grayscale. The temporary tattoo I chose for this card is the desert Earth and sky temporary tattoo. With only a tiny pop of color, I was able to paint the scene however I wanted. This is a pretty big tattoo, so I cut my card to fit the image. Apply the tattoo with the application process explained above, and you are ready to paint.


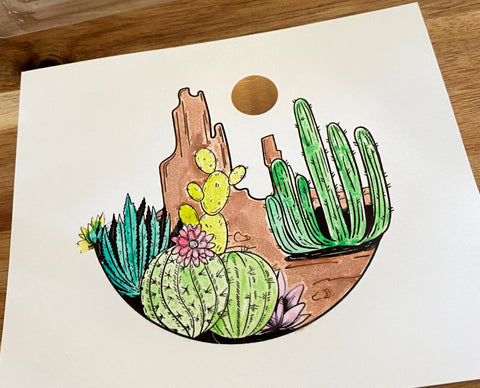
With a small cup of water, a paintbrush, and a watercolor palette, you are ready to go. This part is all up to you! Paint your design however you’d like!

2. Self Inking Magic Paint Palette
I like this method because the ability to control the colors from this palette is much easier than the ones from the actual watercolor palette. I was able to create more of a colorful and glowing color on this card.
The fun thing about the Magic Paint Poster booklet is that you don’t have to have a paintbrush handy. You can always improvise with cotton swabs! Simply dip the swab in water and swirl them over the color of your choice, and there you have it. You are ready to paint.
I cut this card down to match the size of the gray carnation temporary tattoo, so trimming the tattoo during application wasn’t necessary. Once you apply the tattoo to the card, go ahead and paint away. In the pictures below, you can see the difference in the brightness of the paint.


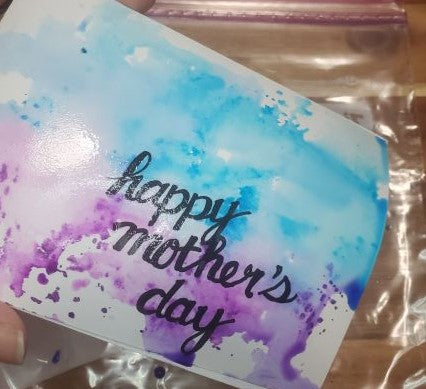
3. Magic Marker Watercolor
When it comes to connecting with loved ones through cards and temporary tattoos, this final method is probably the most fun, which usually means a little messy, but with a great end result.
I wanted to make a Mother’s Day card for this one. So, I added in a little lettering — which will add a small step to the process.
Trimming the temporary tattoo is key on this card because you need to see the placement to decide where you will write your greeting. And then, I wanted a design that created a frame for the greeting on this card, so I chose the gray birds on a branch temporary tattoo.
To get this done, position the trimmed tattoo in place, and sketch your greeting in pencil first, then color over it with a permanent marker. Utilizing a permanent marker is important because you will be using water on the card this time.


Set aside the temporary tattoo and grab your plastic storage bag, magic markers, and water bottle. Place the plastic storage bag on top of the card and use the magic markers to color over the card. You can use as many colors as you like! I choose to use two for this project.
After coloring over the bag, give one good spray using the mist setting with the spray bottle over the plastic bag. Here is where it gets a little messy! Use your finger and mix together the area where the colors meet.


Take the card from behind the bag and slowly press it, face down, onto the watered-down marker. Apply pressure to the card, then slowly peel it back to reveal your handy work.
From here, you will want to lightly blot the excess water from the card with a paper towel and set it aside to dry. Once the card is no longer wet, you can apply the temporary tattoo.

Connecting With Tattoos: Share Your Cards
No distance or pandemic should keep you from connecting with the people you care about. You may not be able to see them, but it takes a little effort to create a card using a temporary tattoo and a bit of creativity to let them know you are thinking of them. So share your creations with those you love and bring a smile to an unsuspecting face! If you enjoyed this article, check our top DIY posts;


Leave a comment
All comments are moderated before being published.
This site is protected by reCAPTCHA and the Google Privacy Policy and Terms of Service apply.